In this article it is shown how you can give analogue old film appearance to a coloured photograph using Photoshop. The original image that I want to transform in Photoshop is shown below:
(Image via treehugger)
The analogue film texture that will be used in this photo manipulation is shown below:
(Image via struckdumb.deviantart)
To do the above mentioned transformation you need to do following steps:
1. First of all you need to place the coloured photograph on this film texture and adjust it using Edit>>Free Transform command or by pressing Ctrl+T so that the photograph may fit well in the white area inside the film texture,the resulting image is shown below:
2. Run Image>>Adjust>>Desaturate command or you press Ctrl+shift+U to run this command.The resulting image is shown below:
3. Run Image>>Adjust>>Curves command or press Ctrl+M to run this command.This will open up the curves window shown below:
Click on the black colour picker tool and use this tool on the portion of your photo where you want your photo to look darkest.I have given the darkest colour to the bush and grass area in this photo.The resulting image is shown below:
Now click on the white colour picker tool and choose the area of the photo which you would like to be the lightest part of the photo.I have used this tool on the sky to make it look lightest in the picture.The resulting image is shown below:
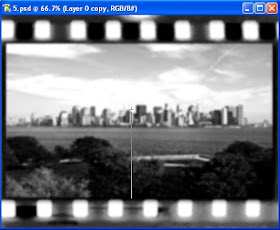
4.Duplicate the image layer.click on the duplicated layer in the layers panel and run Filter>>Blur>>Gaussian Blur command on the duplicated layer by setting the radius to 2 pixels in Gaussian blur window.The resulting image is shown below:
5.Give the copied or duplicate layer a mask by first selecting it and then clicking on the layer mask button at the bottom right corner in the figure shown below.Then with the layer mask selected click on the gradient tool in the left side of the figure shown below and make the settings shown in the top left corner of the figure shown below:
With above settings click on centre of the photo and then on bottom edge of the photo as shown in figure below to create a gradient.
The resulting image after using gradient tool is shown below:
6. Now choose a solid colour layer above all the other layers by running Layer>>New Fill Layer>>Solid Colour command and setting the color to #2b2b25 as shown below:
Then set the blending mode of the solid colour layer that you have just added to Light and set its opacity to 75%.The resulting image is shown below:
7. Now add an other solid colour layer on the top of all other layers by repeating the steps mentioned previously but this time set the colour to #ddd6bf.Change the blending mode of this solid layer to Overlay and set the opacity of this layer to 25%.The resulting image is shown below:
8.Now create a black gradient by running Layer>>New Fill Layer >> Gradient command and make the following settings in the gradient fill window:
Change the blending mode of this layer to soft light,the resulting image is shown below:
9.Now create a now solid layer on the top of all other layers by running Layer>>New Fill Layer>>Solid Color and choose some mild grey color for this layer,as shown in the Figure below:
Now add some noise by running Filter>>Noise>>Add Noise command and making the following settings in Add Noise window:
Then apply Gaussian Blur by running Filter>>Blur>>Gaussian Blur comand and setting the Radius to 1 pixel as shown below:
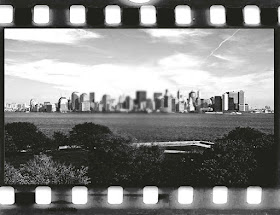
set the Blending mode of this layer to Overlay and Opacity to 15%,the resulting image,which is our final image,is shown below:
Source : tutorialized
3. Run Image>>Adjust>>Curves command or press Ctrl+M to run this command.This will open up the curves window shown below:
Click on the black colour picker tool and use this tool on the portion of your photo where you want your photo to look darkest.I have given the darkest colour to the bush and grass area in this photo.The resulting image is shown below:
Now click on the white colour picker tool and choose the area of the photo which you would like to be the lightest part of the photo.I have used this tool on the sky to make it look lightest in the picture.The resulting image is shown below:
4.Duplicate the image layer.click on the duplicated layer in the layers panel and run Filter>>Blur>>Gaussian Blur command on the duplicated layer by setting the radius to 2 pixels in Gaussian blur window.The resulting image is shown below:
5.Give the copied or duplicate layer a mask by first selecting it and then clicking on the layer mask button at the bottom right corner in the figure shown below.Then with the layer mask selected click on the gradient tool in the left side of the figure shown below and make the settings shown in the top left corner of the figure shown below:
With above settings click on centre of the photo and then on bottom edge of the photo as shown in figure below to create a gradient.
The resulting image after using gradient tool is shown below:
6. Now choose a solid colour layer above all the other layers by running Layer>>New Fill Layer>>Solid Colour command and setting the color to #2b2b25 as shown below:
Then set the blending mode of the solid colour layer that you have just added to Light and set its opacity to 75%.The resulting image is shown below:
7. Now add an other solid colour layer on the top of all other layers by repeating the steps mentioned previously but this time set the colour to #ddd6bf.Change the blending mode of this solid layer to Overlay and set the opacity of this layer to 25%.The resulting image is shown below:
9.Now create a now solid layer on the top of all other layers by running Layer>>New Fill Layer>>Solid Color and choose some mild grey color for this layer,as shown in the Figure below:
Now add some noise by running Filter>>Noise>>Add Noise command and making the following settings in Add Noise window:
set the Blending mode of this layer to Overlay and Opacity to 15%,the resulting image,which is our final image,is shown below:
Source : tutorialized


No comments:
Post a Comment